Tag: Visual edit |
Tag: Visual edit |
||
| Line 156: | Line 156: | ||
Yes. Building. You'll get more information on [https://neus-projects.net/forums/showthread.php?tid=7042 this link.] to the Forums, where the Developer and some helpful souls have been working on their own leisure over making better guides for builds. The following is just a very crude comprehensive guide of how combat styles and builds can be divided. |
Yes. Building. You'll get more information on [https://neus-projects.net/forums/showthread.php?tid=7042 this link.] to the Forums, where the Developer and some helpful souls have been working on their own leisure over making better guides for builds. The following is just a very crude comprehensive guide of how combat styles and builds can be divided. |
||
| − | + | Builds can be divided in five basic categories: |
|
* '''Assassin (and Marksmen)''' |
* '''Assassin (and Marksmen)''' |
||
- '''Below Average''' STR (Around '''30 to 40''' Scaled) ''<u>(Only if your weapon requires it!)</u>'' |
- '''Below Average''' STR (Around '''30 to 40''' Scaled) ''<u>(Only if your weapon requires it!)</u>'' |
||
| Line 175: | Line 175: | ||
taking damage. |
taking damage. |
||
| − | |||
| − | |||
'''- Drawbacks:''' Sometimes very RNG-based. Low HP and resistances. |
'''- Drawbacks:''' Sometimes very RNG-based. Low HP and resistances. |
||
Revision as of 07:15, 1 July 2020
Introduction
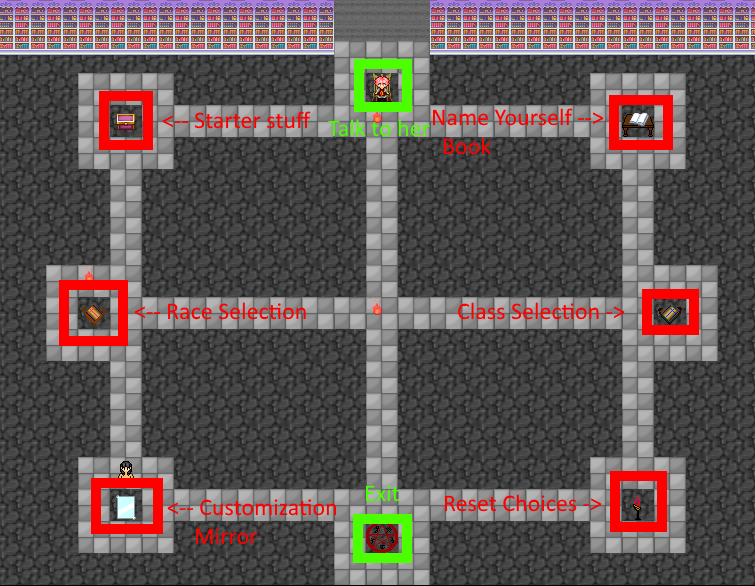
The layout of the Professor Pink's Office, featuring all things. Zoom in to see the names.
Welcome to Sigrogana Legend 2! A turn-based RPG with emphasis on roleplaying on a fantasy setting, where players can explore a vast quantity of randomized dungeons, and enjoy their time building up the story of their own character.
This wiki page will guide you through the vast basics of this fun and immersive game, and will help you learn better about what you can accomplish, and do.
Anyway, we'll start off by showing you the room that you've spawned in, as a fire sprite, or more roughly. A 'Soul', the very quintessential base of your whole being. Though like that you won't be able to go anywhere outside this laboratory.
You can zoom in the picture above to see what they do, and such. As for us, we'll start off with the Race Selection. Since it is required to properly interact with everything else!
Race Selection
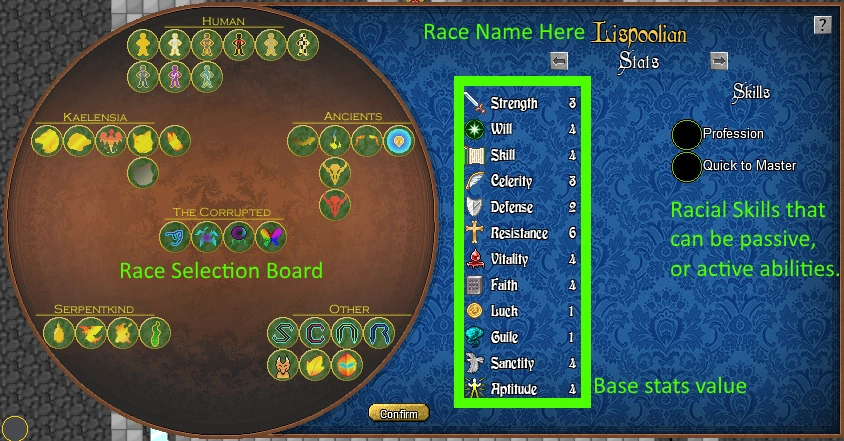
The Race Selection screen, once you interact with race selection area. It should be first thing you will do. You can click on arrow keys on Stats to see the brief summary of race's lore. Zoom in, to see the names.
Once you go over to the Race Selection. It should look like this, Once you decide on a race after reading thoroughly about everything (If you have any specific questions about a race, don't be afraid to ask in OOC about them, be it about their lore or anything, really! This is a very important choice. Races cannot be changed once you are out of Pink's Laboratory, aka the Tutorial zone.)
RE: Bad starting races for New Players.
For this tutorial, I'll choose the 'Imperial' Human, to demonstrate the next step that you'll have to take. Note that base race values, will be major influence factor on which aspects your character will excel at, and stat proficiency varies from race to race.
An example of this is that Felidae are proficient in having Celerity, for having a high Base "CEL", Dullahans can excel in having enormous Strength due to their high Base points in "STR". Imperials, as you can see in the picture, are a jack of all trades for having even stats everywhere.
Base numbers to determine how 'good' or 'bad' their base statuses are might be around this:
| Points | Rate |
|---|---|
| 0 points | Terrible |
| 1 to 2 points | Very Low |
| 2 to 3 points | Low |
| 4 points | Average |
| 5 to 6 points | High |
| 7 to 8 points | Very High |
| 9+ points | Jesus Christ! |
Moreover, it's better to always look around the Wiki about what each stat does:
- Strength (STR)
- Willpower (WIL)
- Skill (SKI)
- Celerity (CEL)
- Defense (DEF)
- Resistance (RES)
- Vitality (VIT)
- Faith (FAI)
- Luck (LUC)
- Guile (GUI)
- Sanctity (SAN)
- Aptitude (APT)
Especially Aptitude, for starters!
Appearance Customization
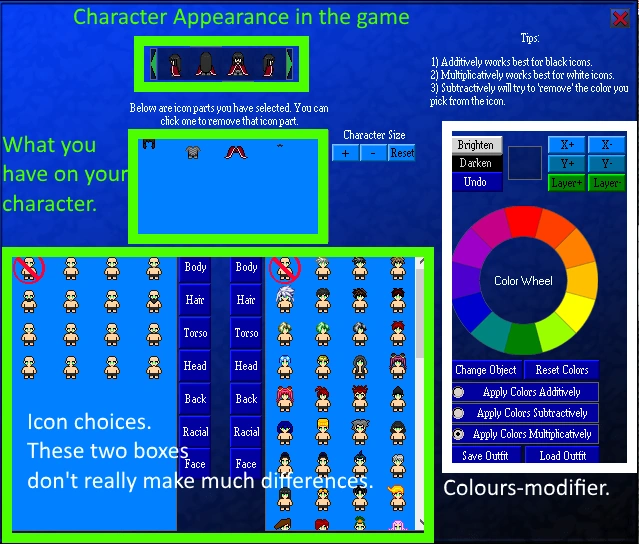
Character Customization Screen. Note that you'll not want to use this until you selects a race, as shown above. If you had not chose a race. You'll not be able to do much customization.
The Character customization can be accessed after you select a race of your choice, this won't be available until you do so.
Once you select a race. You can create your "Player Icon". It's always good to have a Playby*, keep in mind whenever doing this, so your player icon and playby can both be compatible.
- Not all races will have 'Racial' additions.
- It's best to try out the Color Wheel to its full potential, make sure to use Brighten/Darken too for effects you'd want to find. But once you get used to it, you'll be making great icons in no time.
- Character Size makes your character bigger in the game, and thus if your character is bigger individual. You can use Character Size to make your character look bigger,or smaller to put exaggeration on the size of your character.
Once you're done customizing. You'll want to do 'Save Slot', and choose first slot. This is so you don't have to lose all the progress you worked exclusively on that character, and do Load Slot 1. This is in the future where if you wants to have your character having multiple attires. You can use this to change appearance.
Fear not, as you can see, multiple slots are there for a very solid reason. You can change your outfit by using 'Vanity Mirror' objects. Those can be found in certain places, such as Dormeho's Blacksmith, or even be bought as a donation item for 500 Asagos, if you find inconvenient to be running to a public mirror every time.
Now that you're done messing around with character appearance you've made. It's about time we move on over to Name book.
*(I.E Term used for the image material used to describe your character visually, mainly over your Character Profile. Can or not be original, or already-existing art, but you must keep in mind if something is not yours, you have no rights over it. Any legal problems caused by usage will NOT be responsibility of the game or the developer.)
Naming Book

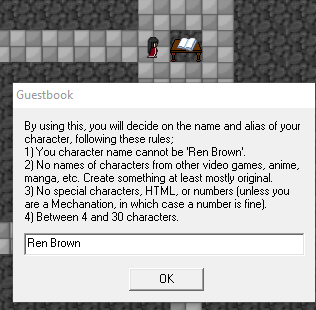
The Naming Book. Where you can change your character's name, and also fake name.
The Naming Book is most essential part that you must complete. You must invent a name for yourself, that you can use to talk to people. Note that you'll have to make at least two names. We'll break them down on what they do. The naming rules are common sense, and that you should best follow them.
>> Name [Your actual name]. You'll have to make up a real name, the name of your character of what you are. This is alias that everybody knows who you are, and such. Telling people your real name, and they'll have in-character knowledge of what your character's name is.
And remember, being named 'Ren Brown' will most likely get you in trouble, since it's but a placeholder. And before you ask, no, this is not a challenge, it's a warning!
>> Alias [Your appearance, or fake name]. You then can create a fake name, or something to explain your appearance. For an instance, you are red-haired male that wears armor. So you could name yourself 'Armored Redhead'. This is first alias that you should toggle when you select a name.
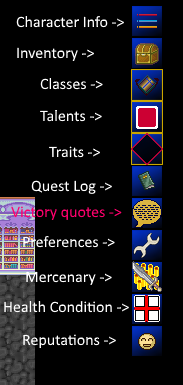
Character Info goes right here! This also shows you what other icons will go to. But we're focusing on character information.
Because the tutorial does not explain this section good enough. You'll have to understands what is going on. In this case, we need to go to the Character Info.
When you do that. You'll see where all your stats, information, and whatnot. Though we're focusing on alias this heading. I'll explain more about stats in next few sections after we gain our first class. For now, we're going to discuss on how to toggle Alias.
On Character Information screen. Whatever name is in display for everyone is highlighted by golden. Toggle between your name and Alias by clicking the 'AKA' button.


Click the AKA button to switch between real name, or fake name.
Once done, we'll move on to Class Selection.
Class Selection


You can also access to this class board from the HUD. This is just there to give you the idea of what you can do.
Now that you're on the Class Selection. You must decide on a class. You'll get this popup. With it, you can also access the class from the HUD under the Classes tab.
Be aware that you can only equip the weapons that your primary class can use. To equip different types of weapons, you'll need a Talent on 'Adaptation', over the weapon type. Though for example, a Summoner can use Sword, and Tome, but you can't use Spears, or Axes that Soldier can provide if it was the primary class.
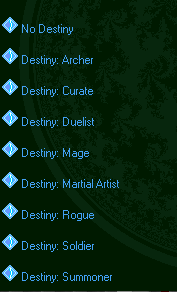
This is list of Destiny options that you can choose from Professor Pink's dialogue.
You'll also notice the 'Lock' Icons in the class board. These are the Promoted Classes, and you can unlock them after you hit specific Class LV and meet specific unlocking conditions that you may explore by looking into this link here.
You'll notice Pink questioning if you want to 'Destiny' or not. It's HEAVILY ADVISABLE TO PICK 'NO DESTINY', unless you are sure you will not want to play anything else but your chosen class. Destiny's only benefits despite its drawback is that the maximum Class Level of LV35 is extended to LV50, and you gain +5 Skill Slots. This means that you have more skill points to use, and being able to cap out more skills provided. Here is list of all destinies that you can choose if you interact with Professor Pink.
Once you finalized on selecting your classes, we'll move to Character Stats.
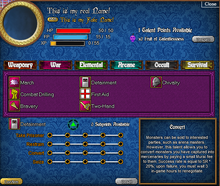
Character Stats

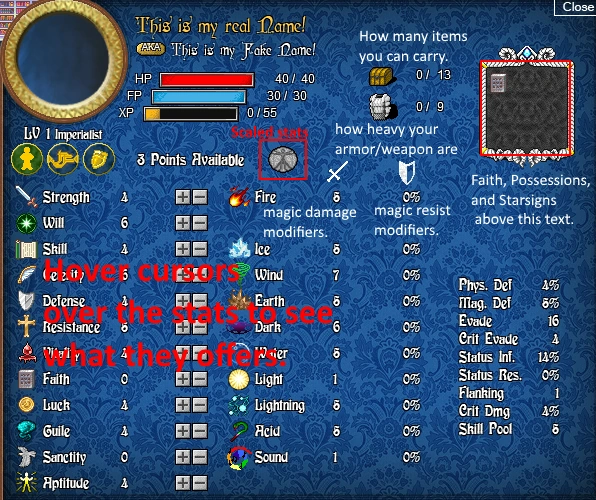
This character information talks about stats.
Here in the image above, this is where you'll do most of your character stats increase. While it seem bunch of gibberish and weird things. It is very important to understand what all of them can do. You must understand what happen if you invest X amount of points into any particular stat. For an instance, if you spend enough points in Aptitude. It'll add +1 stat to all other stats above of that stats, as well as give your char a nifty bonus in EXP gains.
This is why it's recommended for you to spend some of your time reading thorough every stat's description by hovering your cursor on them, and seeing what effects they hold. You'll always gain new stat-points per character level up [Class levels have nothing to do with this, Class Levels = Skill Points, Player Level = Stat Points]
Here's the rule that you must know when you're doing the stat investment. There is a feature called 'diminishing returns' and 'Scaled Stats', and if you looked at the picture already. You'll notice the odd beethoven-ish-god-knows-what-art body-icon where I've named it 'Scaled Stats'. This is your actual stat values, where your stats are influenced. If you do not know what I mean. Do not fear.
The math is rather simple;
"If players start investing more than (40 + base) stat-points into any stat. This stat will be affected by 'diminishing returns', and the stat-point investment will have less and less influence on the 'scaled' stat."
Diminishing Returns
This means, overspending points in the same stats over, and over, will make your character not benefit from all points you invested in.
So sort of like a "wear out". This also mean that you can't just have 80 STR, and be able to one-shot everybody, as you'll probably notice that your strength's scaled is actually less than 64.5 scaled STR!
Where did my 15,5 spent STR points go?
Diminishing returns have claimed them. They're effectively... ineffective. It's merely for game balance. And also, as explained when selecting your race. Your race will heavily influence your diminishing returns!
So how do you spend most of your stats effectively and smartly? By doing this math:
(Legend Aspect) + (Racial Base Value) + (40) = Soft-cap, before diminishing return starts applying.
So for a crude, ruthless and very Onigan example of how spending vs scaling works, there's a table, we'll be using a Catgirl's CEL investment for example! They have 8 base CEL, so that increases their cap from 40, to 48, and can be even 49, if they have a Legend Ink on the aspect Rabe Ur!
| Stat Points | Scaled |
|---|---|
| 40 CEL | 40 Scaled CEL |
| 48 CEL | 48 Scaled CEL |
| 52 CEL | 50.4 Scaled CEL |
| 64 CEL | 60.1 Scaled CEL |
With this you probably might have an idea of how stuff goes. A Felidae will be able to retain more CEL, for being a race with high CEL values for racial, while let's say a Shaitan, will be able to retain more STR, and a Redtail, more LUC. You can get hints of what race specializes in what stat by either their Lore (Redtails being insanely lucky, lore-wise) or just checking their racial stat points (Redtails have 9 base LUC).
Now that you understand the influence of diminishing return. It is very wise not to go overboard, and throw bunch of stats before you're slapped with heavy hard-cap. Balance is important, and so is Aptitude!
If anything, it's recommended to see the "Aptitude" page, before trying to distribute points, and always recommendable to spend your Aptitude first before building.
Building?
Yes. Building. You'll get more information on this link. to the Forums, where the Developer and some helpful souls have been working on their own leisure over making better guides for builds. The following is just a very crude comprehensive guide of how combat styles and builds can be divided.
Builds can be divided in five basic categories:
- Assassin (and Marksmen)
- Below Average STR (Around 30 to 40 Scaled) (Only if your weapon requires it!)
- Very High SKI, CEL, LUC. (Around 55 to 60 Scaled)
- High GUI. (Around 40 to 50 Scaled)
- Below Average VIT (Around 30 to 40 Scaled)
- No investment in any other stat.
- Primarily utilizes Basic Attacks as their main source of damage.

- Assassins have their combat style revolving around disposing enemies as
 fast and clean as possible through high burst damage, and low probability
to miss hitting and critically hitting, trading defenses for damage.

- Defensively revolves around killing the enemy before dying, but mostly through
the use of Evade and Evasion. The lack of DEF and RES may make them allergic to
taking damage.
- Drawbacks: Sometimes very RNG-based. Low HP and resistances.
- Example class(es): Duelist (Kensei, Ghost), Rogue (Void Assassin, Spellthief),
Archer (Ranger, Arbalest, Magic Gunner).
- Bruiser
- Very High STR. (Around 55 to 60 Scaled)
- Average WIL, DEF, RES, VIT. (Around 40 to 50 Scaled)
- Below Average FAI or SAN. (Around 20 to 30 Scaled)
- No investment in any other stat.
- Primarily uses Skills ("Autohits") to damage.

- Bruisers have their combat style revolving around disposing enemies on an more
even ground, building up defenses and utilizing their class skills to damage
without needing to bother going through Hit checks.

- Defensively, Bruisers are just less risky Assassins. Killing the enemy before
you die, but you can take on two or three of them at the same time without
burning out so fast. A Bruiser can be built in many ways, and what differs
them from tanks is that they're ready to sacrifice some durability for more
damage.
- Drawbacks: Once FP runs out, you're useless.
- Example class(es): Duelist (Firebird), Soldier (Demon Hunter),
Martial Artist (Boxer, Verglas, Monk).
- Tank
- Very High DEF, RES, VIT. (Around 55 to 60 Scaled)
- Average WIL, STR, SKI, FAI or SAN. (Around 40 to 50 Scaled) (Varies greatly
depending on what you're doing!)
- No investment in any other stat.
- Primarily uses Skills ("Autohits") to damage, together with
unrelated-to-stats sources of damage like Bombs, Cinders, Poison, Youkai, etc.

- Tanks are much slower Bruisers who soak up all damage like sponges and often
 stand tall with 1000+ HP. They're terrible at damaging, but they can often
stall combat for long enough to let on-hit effects or status effects to do
the damage for them, like Poison, Burn, Lingering Damage, Cinders,, etc.

- Defensively, Tanks are the definition of defense. But some may decide to sport
ways of healing to further prolong their longitivety, like potions, for example.
- Drawbacks: Same as Bruiser. Additionally, a lot of enemy effects tend to
reduce DEF/RES and sometimes even fully ignore it, so probably RNG too.
- Example class(es): Soldier (Black Knight, Tactician), Rogue (Engineer),
Mage (Hexer, Rune Magician), Curate (Priest), Summoner (Grand Summoner).
- Mage
Basically can be either Bruiser or Tank, but uses a Tome, WIL and Spells instead
of Basic Hits and Skills.
The only risk being Silence completely halting Spells from being cast, and maybe
running out of FP.
- Example class(es): Mage (Hexer, Rune Magician, Evoker),
Curate (Priest, Lantern Bearer), Summoner (Bonder, Grand Summoner),
Rogue (Void Assassin, Spellthief).
Equipment, star-signs, religions, and possession.
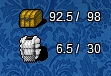
Total Weight: The Weight indicator on top represents how heavy the total accumulated items you're carrying in your inventory. If you pass the limit you can safety hold. You'll start to suffer penalties, slow down outside of battle and even lose momentum in combat! So always make sure your inventory's within your STR's capabilities.
Battle Weight [BW], which is represented by a chest plate, below the chest, is how heavy your equipment is. The heavier the weight, the worst it is on your Evade, Hit and Move. For more information, click here.

'Religion: This is unlocked through a specific Talent, 'Devotion - Prayer. On the right of these two icons is a fancy-looking box. The first icon is 'God Loyalty', clicking it will show the level of your Loyalty to a god, as well as show some more lore about them. You do not follow any god until you pray to them at least once through the use of their respective Prayer Tool.
Once you use it while having atleast 25 Mental Stamina, you'll receive a Prayer buff and be given loyalty to the Religion you used the praying tool on.
(Having a religion is not mandatory both IC and OOC, this is purely optional fluff with small boons.)
'Starsign: This is unlocked through a specific Talent, 'Astrology - Starsign. Once unlocked, you'll obtain a default placeholder sign that you can click to select your character's "Starsign". It gives you a permanent bonus to a specific status and elemental ATK tied to the sigil.
(Having a starsign is not mandatory both IC and OOC, this is purely optional fluff with small boons.)
'Possessions: This is unlocked through a specific Talent, 'Spiritualism - Possession. On the far right is your Possessions tab, indicating how many spirits are possessing you at this moment. These spirits can offer you bonus, and benefits for being possessed by them, but you'll take HUGE damage from enemies who use any 'Exorcist'-enchanted weapons. Those "enemies" are often other Players who challenge you to PvP, so if you wanna play the game to be an adventurer or dungeon crawler, you don't need to worry about anything but losing a battle. (Spirits leave you if you die, and you'll have to re-collect them again.)
(Having spirits is not mandatory both IC and OOC, this is purely optional fluff with small boons. Additionally, random spirits possessing you may influence your behavior a little, but not take full control of your being. The mental influence of spirits are generally weaker than the player's own, in the exchange.)
Talents and Traits

What Talent Section looks like.
Talents are another thing which is quite essential to distribute onto smartly, although you'll be able to redo them with a Fruit of Talentlessness if you are not satisfied with the end results.
As usual, make sure to read over everything they do, and pick only what you're going to make use of. Don't waste those points, or they might waste you later!
Traits
Traits are similar to Talents, but they're much more notable and 'active' in a sense. Those are what differ a player from another based on their own choices on fluff. Sometimes they even upgrade a character's racials a little.
For this, just pick whatever benefits you and go from there. And like Talents, too, they can be redone by clicking the 'Respec' button. Any day, any time.
I'M FREEEEEEEEEE!
You're finally out of Pink's grasp! I hope you've read everything three times over and memorized the basics of CQC, soldier! You'll need to remember it every time you have to make a Jammer sorry for existing. BUT HOLD IT RIGHT THERE! We're not done here!
First things first, you need to know a few little details that Pink didn't quite explain because it's not her business to babysit you. And those are about quests, which will help you level faster, and where to level your first baby steps/slashes/punches/casts/shots/stabs/pokes/summoningjutsu/whatever you chose to be your fighting style.
So. You've left that study... Now look at where you are...
BANG! Right in front of a big-as-heck medieval city and probably being stomped over and over by people who swarm in and out of the place constantly. You'll try to follow them in! Go through the gates-- Holy, what's that? Spears? Yes, soldier. Cellsvich doesn't welcome nor tolerate mongrels who don't agree to behave like CIVIL and FINE human beings! That's the IC rule number one.
Cellsvich and the Empire love to chop their problems in half. And if you become one of them? I'm afraid but your life might end quite sooner than expected...
See the woman who's waving at you over there? Go talk to her. She's the Chief Inspector of our vast force, and will see if you're an intelligent-enough maggot to be worthy-- What?! Already got interviewed and she handed you your passage papers?
It's time to become a functional citizen up to the world's most basic adventuring standards.
Bank (ASAGO) and Quest System (LaPlace-NET)
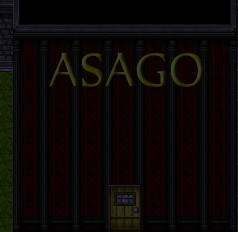

Asago Building. There's alot of it like it.
Move RIGHT AWAY to the ASAGO Bank!
This place is where you'll be doing roundtrips the most. It is located in the upper left hand corner of the Cellsvich.
Once player gets inside the building, and talks to the NPC about LaplaceNet. She'll ask you to create custom handle that you can just type gibberish, or something fancy. Up to you, honestly. Just remember you'll never, 'ever' be able to change your LaPlace ID, even if you repurpose your character.
Then you click on panel next to the woman on the table, and you'll see this menu here:
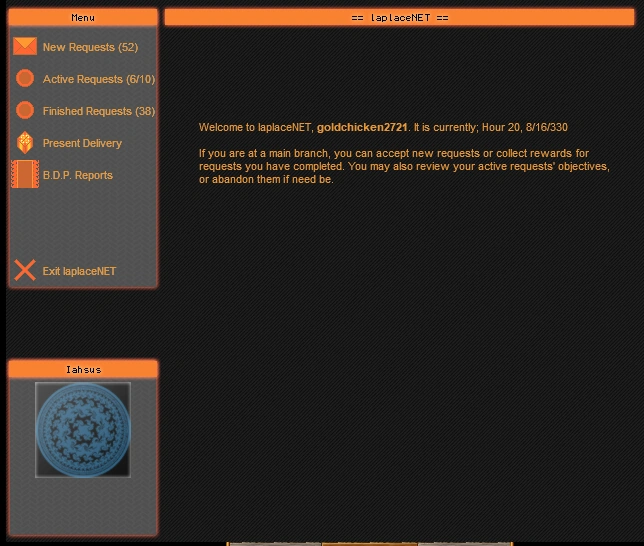

The Panel. Containing quests, and whatsnot.
This panel is just straight-forward.
- B.D.P Reports show you what dungeon is spawning and where, as well as the time.
- Present Delivery is often a way for admins to send apology gift, or receive special gifts for special holidays.
- Finished Requests is the requests that you've completed.
- Active requests is the request that you're currently undertaking.
- New requests are where you receive new quests to do, and can only be selected from an ASAGO Bank. (Unless you donate and buy a LaPlace PDA, which is recommended. Makes life easier!)
Which you'll be using a lot if you want to get higher level faster. When the player starts out the game. They'll get one request, to talk to the woman that they've just talked to get their own LaPlaceNet card. Then they'll complete the quest, and then all quests will be generated. My advice right now, is to grab the 'Eradicate Jammers' Quest, and we'll go from there.
The first Adventure!
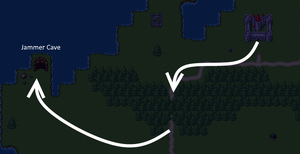
The first public static instance, the Jammer Cave. It's level 1 to 8 dungeon that persists until Argentyle Caverns, which is scaled-dungeon of its own. We won't talk about the latter, but focus on the Jammer Cave. You can find the Jammer Cave by going outside of the Cellsvich, then go south, and west. Then north, and you'll find yourself promptly in the cave.
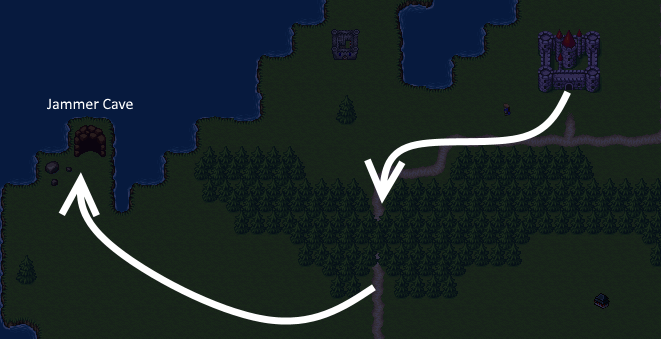
The path to the Jammer's cave. There is also trick to going around the forest by using the numpad movement!
As you walk around in the cave, you'll find yourself fighting many, many, MANY Jammers. But hey, practice makes perfection. Soon you'll be leveling up and become more and more powerful, to the point those Jammers will be tickling you, or unable to hit you due to your speed. Or both, really!
You don't need to fear the "Jammer Menace" until you reach LV10, as you don't lose Items or Murai upon death. Past LV10, you should start worrying about fights more.
Also, don't forget to salvage the place! The big chests, campfires, mining rocks and little chests will have a lot of loot that may or not give you a good starting equipment. The wood/ore you get from the Jammer Cave might even give you a good loan of Murai which you can use on Inns, once you sell it to Zeo at Cellsvich. His shop is located west from the Inn.
Also, also. Don't forget to buy Lockpicks from Zeo, in the future you might need them!
Now, once you got into several fights, the blood heating and cooling? That's the feeling of progress, my friend. You should head back to town, and explore for a bit. After all, you've finally completed, and done everything you can do. It's time to worry a bit on to get LV60 and then finally be able to roleplay with people on an even ground. Of course, there's still a long road ahead, but don't feel intimidated.
The first step forward is which makes you arrive somewhere...
Go forth and become a Sigrogana Legend, on your own way and style!
They grow so fast... Good god, I'll miss you! Come read me again some other time, yeah? :'( ~ Kunai
Other Info
You'll notice that I've not discussed Companion [Mercenary system], or Battle System. Here, I'll explain it more in their own wiki pages.
In-game Rule [Don't break the rules! Just don't.]
Story Questlines [The most immersive way to learn Lore!]
Battle Guide [Still confused on how to fight?]
Companion Guide [Wanna know how mercenaries work?]
Legend Extension [Fresh LV60? Look here!]
Found campfire? Can't enter? Look here! [Wanna share scary tales, but can't enter? Look here!]